How to Choose a Triathlon Helmet: Fit, Safety and Aerodynamics
Choose a triathlon helmet by fit, safety standard, condition and race rules. Compare road, aero-road and TT styles without guessed speed gains.
By Lotte
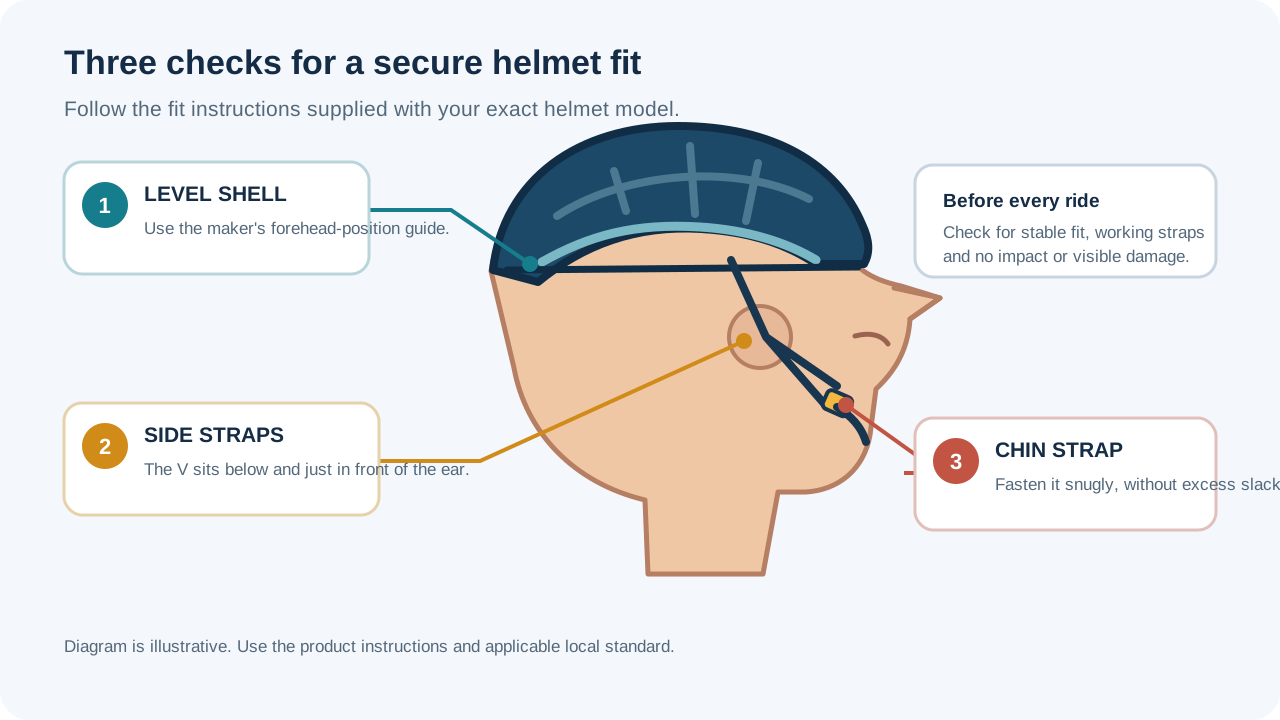
Choose a triathlon helmet in this order: confirm it is a bicycle helmet that meets the safety standard for your country and event, find a shape that sits securely on your head, verify the shell and straps are in good condition, then decide whether the road, aero-road or time-trial style suits your riding and course. A helmet label or aerodynamic shape cannot compensate for poor fit, an impact-damaged shell or a rule mismatch. Rehearse the exact helmet, eyewear and riding position before race day.
Key takeaways
- 1Fit, condition and the applicable safety standard come before helmet style or aerodynamics.
- 2Try several shapes and sizes; circumference is only a starting point, and the helmet should sit level and stable according to its instructions.
- 3Standards and event rules differ by jurisdiction and organizer, so verify the marking and current athlete guide for your race.
- 4Road, aero-road and time-trial helmets make different trade-offs in airflow, coverage, visibility and position; no style promises a personal time saving.
- 5After a crash or suspected impact, follow the manufacturer and safety authority replacement guidance even if the outside looks undamaged.
In this article
- 1The short answer: fit and safety decide the helmet
- 2Check the rules for your country and your race
- 3Choose a shape that fits your head, not just its measurement
- 4Adjust the helmet and straps in a repeatable order
- 5Understand what a safety label means—and what it does not mean
- 6Replace a helmet after an impact or when its condition is uncertain
- 7Compare road, aero-road and time-trial helmets
- 8Put ventilation and heat management into the decision
- 9Check vision, eyewear and visor handling
- 10Treat aerodynamic claims as comparisons, not promises
- 11Rehearse the helmet in your real riding position
- 12Make transition handling safe and automatic
- 13A practical buying checklist
- 14What a helmet can and cannot do
- 15Sources and rule scope
- ⚖Road, aero-road and time-trial helmet trade-offs
- ?Frequently asked questions
The short answer: fit and safety decide the helmet
For most triathletes, a suitable helmet is a certified bicycle helmet that fits securely, remains comfortable in the riding position, meets the event's current rules and has no uncertain crash history. Start by finding a good fit and applicable safety marking. Compare road, aero-road and time-trial (TT) designs only after a helmet passes those checks.
There is no one helmet shape that works for every head, and a high price does not guarantee a better personal fit. Aerodynamic claims are conditional on the rider, position, speed and test setup; a claim from a manufacturer is not a promise of your race-time saving. Ventilation, visibility, buckle access and comfort over the expected ride also matter.
If you are buying for your first race, a comfortable road helmet you already own may be suitable if its condition, certification and event rules check out. Use the fit checklist below as a starting point, read your event's athlete guide and practise with the exact glasses, hair and bike position you plan to use.
Check the rules for your country and your race
A helmet should be designed and marked for bicycle use in the place where it is sold and used. Safety standards are jurisdiction-specific. In the United States, the Consumer Product Safety Commission's bicycle-helmet standard is 16 CFR Part 1203; look for product documentation and the helmet's compliance label. In the European Union, the European Commission's road-safety material describes an approved adult bicycle helmet as carrying a CE mark and the EN 1078 standard number. Other markets have their own requirements. Confirm current local regulations rather than assuming that a mark used in one region automatically satisfies every other market or event.
The race organizer can add equipment rules. World Triathlon's FAQ says officials check bicycle helmets against the rules at its events; IRONMAN publishes its own annual competition rules and notes that local laws or event details can vary. A local event may follow a national federation's rulebook. Use the latest athlete guide and briefing for your specific race, and contact the organizer if a helmet style, visor or certification label is unclear.
Competition rules may specify when the helmet must be on and fastened, how it is checked, and when it can be removed. Do not rely on a transition routine copied from a different event. For practice, assume the helmet must be securely fastened before you move onto the bike course, and follow the precise instructions issued by your officials.
Choose a shape that fits your head, not just its measurement
Head circumference helps narrow a size range, but two helmets with the same size label can feel very different. Brands and models use different internal shapes, padding arrangements and retention systems. Try more than one option when possible. A helmet should sit level, cover the forehead as its maker instructs, feel snug without painful pressure, and remain stable when you move your head.
Try it with the eyewear, hairstyle and any permitted accessories you expect to use. A thick braid, glasses arm, cap or headband can change the way the shell sits or the straps lie. Do not add padding, alter the shell or force a retention dial beyond its intended adjustment to make a poor shape work. If it pinches, rocks, leaves a gap or reaches the end of its adjustment range, try another size or model.
Fit should be comfortable enough that you will wear the helmet correctly for every ride. A shell that causes a strong pressure point in the shop is unlikely to become a good choice after hours on the bike. If you are uncertain, ask a trained retailer to help check fit and consult the manufacturer's instructions for the model.
Adjust the helmet and straps in a repeatable order
NHTSA's bicycle-helmet fitting guide offers a straightforward sequence. Start with the helmet level on the head and low over the forehead, with the front edge roughly one or two finger-widths above the eyebrows. Adjust the sizing pads or retention system so the shell is snug. The exact mechanism differs by model, so the manufacturer's instructions control.
Next, position the side-strap sliders so the straps form a V under and slightly in front of each ear. Center the buckle beneath the chin. Fasten the chin strap and adjust it until snug; NHTSA's guide uses a one- or two-finger check rather than leaving a large gap. Make sure strap ends and keepers are arranged as the instructions show, and that no excess webbing is likely to flap or catch.
Do a movement check: open your mouth widely and move your head in several directions. The helmet should stay in its intended position rather than sliding forward, backward or sideways. Recheck with a mirror or another person if you can. This is a quick fitting check, not a laboratory test of protection. If the helmet moves despite correct adjustment, the fit may not be right for you.
See the helmet-fit diagram at the top of this guide, and use the final pass/fail check before each ride.
Understand what a safety label means—and what it does not mean
A certification mark helps confirm that the model was designed and evaluated against an applicable standard. It is an important purchase check. It does not mean the helmet can prevent every injury, that it is impervious to damage, or that all models will behave identically in every crash. CPSC explicitly warns that no helmet can protect against every possible impact.
Check the label on the helmet itself and keep the instruction booklet, model identification and purchase information. Be wary of an unfamiliar online listing that shows a generic certification image but does not identify the model or manufacturer. Buy from a source that can provide authentic product details, and compare the exact model against the applicable standard and organizer requirements.
Do not choose an activity-specific helmet meant only for skateboarding, snow sports or another use unless the manufacturer identifies it for bicycle riding and it meets the relevant standard. A shell's shape or a seller's phrase such as “multi-sport” is not enough to establish that it is appropriate. If the label is missing or illegible, contact the manufacturer rather than guessing.
Replace a helmet after an impact or when its condition is uncertain
A bicycle helmet that has been involved in a crash or meaningful impact may have internal damage that is not visible from the outside. NHTSA advises replacing a helmet after a crash, and CPSC's current consumer guidance explains that bicycle helmets are designed around a damaging single impact. Follow the product maker's replacement instructions and do not keep racing in a helmet after an impact just because the shell looks clean.
Inspect the shell, liner, straps, buckle, adjustment system and pads before the season and after transport. Cracks, crushed or exposed foam, a loose shell, worn straps, a buckle that will not lock, missing pads or a retention system that slips are reasons to stop using it and ask the manufacturer for guidance. Do not glue, tape or reshape damaged components unless the manufacturer specifically directs a repair.
There is no universal age that makes every helmet safe or unsafe. Follow the maker's recommendations and account for use, heat, sunlight, chemicals, storage and visible wear. CPSC's 2026 brochure says that if manufacturer guidance is unavailable, replacement within five to ten years may be prudent depending on use, care and storage. That is a broad fallback, not a warranty that any helmet is safe until a particular birthday.
A second-hand helmet may be inexpensive, but you usually cannot verify its impact history, care or storage. If that history is unknown, a correctly fitting new helmet is the more dependable choice.
Compare road, aero-road and time-trial helmets
A road helmet is shaped for general cycling and often has more open vents. It can be a practical choice for training and racing when it meets the event's requirements and fits well.
An aero-road helmet typically uses a smoother shell or different vent layout to manage airflow while retaining a conventional road-helmet profile. Designs vary: “aero” is not one regulated shape or a guarantee of lower drag for every rider.
A time-trial helmet is designed around a more tucked cycling posture and may have a longer tail, integrated visor or fewer openings. Some models are intended to work best when the rider holds a relatively consistent position. A rider who often lifts the head, changes posture or cannot see comfortably through the visor may not get the expected benefit.
Treat these as broad categories, not a ranking. Compare comfort, visibility, ventilation, fit, eyewear compatibility and the position you can actually hold. Ask whether a visor can be removed or replaced as the maker specifies, and verify that any helmet remains legal under your event's current rules. If you want a more detailed type comparison, see road vs aero-road vs TT triathlon helmets.
Put ventilation and heat management into the decision
A helmet can feel comfortable indoors and noticeably warmer on a long exposed ride. The number and placement of vents, shell coverage, sun exposure, pace, humidity and individual response all affect comfort. A more enclosed shape may trade airflow for a different aerodynamic design, but no generic “safe temperature” distinguishes when it is appropriate.
Think about your actual event: time on the bike, shade, course elevation, expected conditions and how you respond to heat. Try the helmet during a ride that resembles the intended use and follow any product guidance about covers or accessories. Do not improvise a shell cover, tape over vents or attach components in a way the maker prohibits. If conditions become unsafe, follow organizer instructions and heat-safety guidance rather than trying to solve the problem by changing helmets at the start.
Athletes with a history of heat illness, a condition affecting temperature regulation or medications that may affect heat tolerance should seek individualized medical advice about hot-weather exercise. A helmet choice cannot make a hazardous environment safe.
Check vision, eyewear and visor handling
Clear forward and peripheral vision matters more than an aerodynamic profile. Try the helmet with the glasses or visor you plan to wear and look ahead from both an upright and race-like riding position. Check for a brow or visor that blocks the road, distortion through a lens, glare, fogging or contact between the helmet and glasses.
If the helmet uses a magnetic or clip-in visor, practice installing, removing and storing it while stationary. Follow the manufacturer's method; do not force a connection that is misaligned or damaged. A visor that you cannot adjust securely with gloved or damp hands may not be practical for your race. Confirm whether your organizer has any restrictions on visors, shields or attachments.
Do not test visibility for the first time on a fast descent or in traffic. Use a safe, controlled ride and keep your hands on the controls while checking your view. If the helmet makes you raise your head or move into a position you cannot sustain comfortably, re-evaluate the model or riding position before race day.
Treat aerodynamic claims as comparisons, not promises
A wind-tunnel or computational-fluid-dynamics result is specific to a test setup. The result can depend on rider posture, yaw angle, speed, helmet placement and how the test compares models. A manufacturer’s result may be useful for comparing its own products under stated conditions, but it does not tell you exactly how many seconds you will save on your course.
If aerodynamics are important to you, look for transparent methods: what helmet and baseline were compared, what position the rider held, what speeds and wind angles were included, whether the test included real riders or a mannequin, and who conducted it. Check whether the quoted result is a drag measurement, power estimate or projected time. Those measures are related but not interchangeable.
Even a helmet with a favorable test result can be a poor choice if it causes discomfort, reduces visibility, worsens heat management or makes it harder to maintain your position. The best model for a given rider is not necessarily the one with the lowest number in a single test. Do not trade stable control for an unverified speed claim.
Rehearse the helmet in your real riding position
Set the helmet up with your usual glasses, straps and hairstyle, then ride in a safe place before racing. If you use clip-on bars or a low position, check whether you can see ahead without repeatedly craning your neck. A stationary trainer can help you assess basic fit, but it does not reproduce road vision, wind or handling.
Try the intended helmet for an easy ride long enough to reveal pressure points, strap rubbing and heat discomfort. Practise opening and closing the buckle with damp fingers, and check that sweat or eyewear does not interfere with vision. If the helmet has a visor, confirm it stays attached and does not fog in the conditions you expect. Do not experiment with a new helmet on a technical ride or race simulation that exceeds your skill level.
Keep the helmet adjusted after you find a good fit. Recheck it if you change pads, wear a different hairstyle, adjust the retention system or travel with the helmet. A fit that was stable in the shop may change after straps are disturbed.
Make transition handling safe and automatic
Your helmet should be easy to find and fasten without rushing. Put it in the place allowed by the race and arrange the straps so the buckle is accessible. Practice the sequence while stationary: reach for the helmet, place it, fasten it, check the fit, then move the bike only as the event rules permit. The order of actions and penalties for violations are event-specific, so use the current athlete guide.
At the end of the bike, remove the helmet only when the organizer's rules allow it. For many events, it must remain fastened while you are still on or handling the bike; verify the exact rule for your race. Never ride with an unfastened helmet or loosen the straps because you feel hot. If the buckle jams or a strap is damaged, stop and seek help rather than improvising a repair in transition.
Transport the helmet in a way that avoids crushing or heavy objects pressing on it. The race-day packing checklist can help you keep it with essential bike equipment without burying it under loose gear.
A practical buying checklist
Before paying, work through these checks:
- Use: Is the model designed for bicycle riding and allowed by your event?
- Standard: Can you identify the relevant certification label for your country and the exact model?
- Fit: Does the shell sit level, remain stable and adjust without painful pressure?
- Condition: Is the helmet new or does it have a reliable history with no impact or material damage?
- Vision: Can you see the road and traffic clearly from your normal riding positions?
- Comfort: Do straps and padding remain comfortable with your eyewear, hair and expected conditions?
- Practical use: Can you fasten it accurately in transition and maintain it according to the maker's care instructions?
- Evidence: If an aero claim matters to you, are its test conditions transparent and relevant to how you ride?
If an option fails one of the safety checks, remove it from consideration regardless of its features. If several pass, choose the helmet that fits best and meets your needs at a price you can afford. The comparison is easier when you record what you observe, rather than relying on a size label, a star rating or a race-time promise.
What a helmet can and cannot do
A bicycle helmet is an important piece of protective equipment, but no helmet can prevent every head injury or make a collision harmless. Use a correctly certified, well-fitted helmet every ride, follow traffic laws and event instructions, maintain control of the bicycle and choose routes appropriate to your experience. The helmet does not replace visibility, skill, safe speed or attention to road conditions.
After any crash, take the time to check for injury as well as damage to equipment. A helmet that has absorbed an impact may need replacement even if it looks intact. If you experience headache, confusion, vomiting, loss of consciousness or other possible concussion symptoms after a collision, seek medical evaluation promptly. Do not return to riding based only on the helmet's appearance or a quick self-check.
The sensible helmet choice is therefore a repeatable process: confirm the standard and rules, get the fit right, inspect condition, compare style for your course and position, then rehearse it. A helmet you can wear correctly and comfortably is more useful than an impressive feature list.
Sources and rule scope
The U.S. NHTSA helmet-fitting guide gives step-by-step position and strap checks. The Consumer Product Safety Commission bicycle helmet guidance describes the U.S. standard, impact replacement and condition considerations. The European Commission's road-safety thematic report discusses bicycle helmet markings in the EU. For event rules, consult World Triathlon's triathlon FAQ, its current competition rules, and the relevant organizer's latest guide; IRONMAN's competition rules page notes that season and local rules can differ.
Sources checked 24 September 2026. This guide does not test or rank individual helmet models.
Road, aero-road and time-trial helmet trade-offs
| Style | Typical design emphasis | Check before choosing |
|---|---|---|
| Road | General riding, ventilation and everyday use | Secure fit, visibility, condition and event compliance |
| Aero-road | Smoother exterior while retaining a road-helmet profile | Fit, airflow, eyewear and evidence for your riding position |
| Time-trial (TT) | Aero-oriented shape for a race posture; visor may be integrated | Forward vision, posture compatibility, heat comfort and race rules |
Sources
Sources are listed so readers can verify consequential claims and dated details.
- Fitting Your Bike Helmet — National Highway Traffic Safety Administration (accessed September 24, 2026)
- Which Helmet for Which Activity? — U.S. Consumer Product Safety Commission (accessed September 24, 2026)
- Thematic Report: Cyclists — European Commission Road Safety (accessed September 24, 2026)
- Triathlon FAQs — World Triathlon (accessed September 24, 2026)
- Competition Rules — IRONMAN (accessed September 24, 2026)
Frequently asked questions
How tight should a triathlon helmet be?
It should sit level and snug, remain stable when you move your head, and follow the manufacturer's fit instructions. NHTSA's fitting guide uses a one- or two-finger check under the chin strap. If the shell rocks or creates painful pressure after correct adjustment, try a different size or shape.
Which safety standard should a triathlon helmet meet?
Use a bicycle helmet standard that applies where the helmet is sold and ridden, then check the event's rules. In the United States, bicycle helmets are subject to CPSC's 16 CFR Part 1203; European Union guidance references CE marking with EN 1078 for adult bicycle helmets. Requirements differ by location.
Can I use a road helmet in a triathlon?
A road helmet can be suitable if it is designed for bicycle use, meets the applicable standard, fits correctly, is in good condition and complies with the specific race rules. Check the current athlete guide for helmet and visor requirements.
Is an aero or time-trial helmet faster?
It may reduce aerodynamic drag under some test conditions, but the result depends on speed, rider position, yaw angle and model. A test result does not guarantee your personal time saving. Fit, visibility, ventilation and safe control take priority.
Should I replace my helmet after a crash?
Yes, follow the helmet maker and local safety guidance after an impact. Bicycle helmets can have damage that is not visible from the outside; do not assume an intact-looking shell remains usable.
How often should I replace a triathlon helmet?
Follow the manufacturer's age and replacement instructions, and replace it sooner for impact, cracking, crushed foam, worn straps, a faulty buckle or other damage. CPSC's 2026 guidance offers a broad five-to-ten-year fallback when maker guidance is unavailable, with use, care and storage affecting that decision.
Can I buy a used triathlon helmet?
Only if you can reliably establish its model, condition, care and impact history, and it still meets current requirements. If the history is unknown, a new helmet is the more dependable option.