Triathlon Hydration Gear: Bottles, Cages, Bike and Run Systems
The equipment side of staying hydrated in triathlon — bottles, cages, aero and behind-seat systems, run-leg gear, and how to choose, use and clean it all.
By Lotte
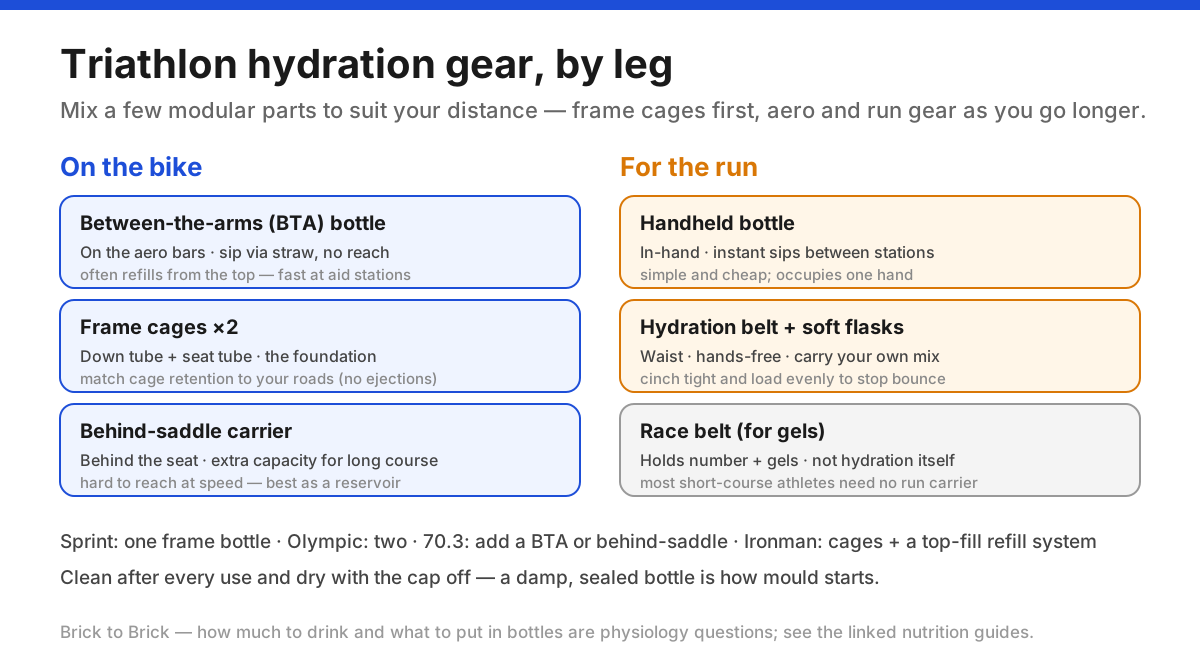
This is the hardware guide to triathlon hydration — the bottles, cages and carriers themselves, and how to choose, fit, use and clean them. It deliberately leaves the science of how much to drink and what to put in your bottles to our nutrition guides, and the fine detail of aero drag to our placement guide, so it can focus on the gear: what each system is, how to stop bottles bouncing out, the run-leg options most guides ignore, and the cleaning routine that keeps it all from going mouldy. Get the kit right and hydration becomes one less thing to think about on race day.
Key takeaways
- 1A triathlon hydration setup is built from a few interchangeable parts — frame cages, an aero front (BTA) bottle, a behind-saddle carrier, and run-leg carriers — mixed to suit your distance
- 2Bottle retention matters more than people think: the wrong cage on a rough course ejects bottles, so match cage tightness and entry style to your roads
- 3A refillable top-fill aero bottle turns messy aid-station hand-ups into a quick pour, which is why long-course athletes favour them
- 4The run leg has its own gear — handhelds, belts and soft flasks — that the bike-focused guides skip; most short-course athletes need none of it and rely on aid stations
- 5Hydration gear needs cleaning: bottles and bladders grow mould fast, so a simple dry-and-wash routine is part of owning the kit
In this article
- 1The pieces of a triathlon hydration system
- 2Choosing bottles and cages: the details that matter
- 3Bike hydration hardware: matching capacity and access to your distance
- 4Run-leg hydration gear (the part most guides skip)
- 5Filling, carrying and swapping: using the gear well
- 6Cleaning and maintaining hydration gear
- 7Matching your kit to the race — and where to go next
- ⚖Triathlon hydration gear at a glance
- ?Frequently asked questions
The pieces of a triathlon hydration system
Triathlon hydration gear looks complicated because there are several systems, but they're really just modular parts you combine. Knowing what each one is makes choosing easy.
On the bike:
- Frame bottle cages — the standard cages that bolt to your down tube and seat tube. The foundation of every setup.
- Between-the-arms (BTA) / front bottle — a bottle mounted on the aero bars, usually with a straw, so you can sip without moving your hands. Often refillable from the top.
- Behind-saddle carrier — one or two cages mounted behind the seat, tucked out of the wind, for extra capacity on long courses.
- Downtube/frame storage — bento boxes and frame bags aren't hydration, but they sit alongside your bottles and hold the electrolyte tabs and gels that go with them.
For the run:
- Handheld bottle, hydration belt, or soft flasks — small carriers for the run leg, covered in their own section below.
- Race belt — an elastic belt that holds your race number and gels; not hydration itself, but part of the same kit.
You don't need all of it. A sprint athlete needs one cage; an Ironman athlete might run frame cages plus a BTA plus a behind-saddle carrier. The rest of this guide is about choosing and using these parts well.
Choosing bottles and cages: the details that matter
Bottles and cages seem trivial until one launches across the road at 35 km/h. A few details separate reliable gear from frustrating gear.
Bottle type. Standard squeeze bottles are cheap, easy to drink from and simple to refill — perfect for frame cages and the run. Rigid aero bottles (behind-saddle torpedoes) hold their shape in the wind but are harder to squeeze; most people drink from these via a straw or use them as a refill reservoir.
Leak-proof valves. Electrolyte mix that weeps out coats your bike in sticky residue and attracts grit into your drivetrain. Choose caps with a positive shut-off, and close them after every sip in training so it's automatic.
Cage retention — the ejection problem. On chip-sealed or cobbled roads, vibration walks bottles out of loose cages. Two fixes: pick cages with firmer retention (side-entry and wrap-around designs grip better than flimsy open cages), and match cage tightness to your bottle — some cages have an adjustment screw. If your course is rough, test the exact bottle-and-cage combo over bumps before race day. A lost bottle can mean a lost race in the heat.
Top-fill refillable systems. Many BTA and behind-saddle bottles refill from the top, so at an aid station you tear open a hand-up bottle and pour it straight in rather than swapping bottles. This is a big reason long-course athletes run these systems — it's faster and less wasteful than a mid-ride bottle exchange.
Bike hydration hardware: matching capacity and access to your distance
The right amount of on-bike gear scales with how long you'll be out there and how easily you can refill. This is about capacity and access — for the aerodynamic trade-offs of where you place bottles, see the dedicated aero bottle placement guide.
A sensible hardware progression:
- Sprint (~1 hour): one frame cage. You'll drink only a few hundred millilitres; anything more is dead weight.
- Olympic (~1–1.5 h on the bike): two frame cages give you enough capacity without refilling.
- 70.3: two frame cages plus a BTA or behind-saddle bottle, and a plan to refill at aid stations. You're carrying more than a litre at a time and topping up.
- Ironman: you physically can't carry the whole day's fluid, so the hardware exists to hold enough between aid stations and refill fast — frame cages plus a top-fill front or rear system.
How much fluid those bottles should actually contain is a physiology question, not a gear one, and it varies enormously between athletes and conditions. Sports-medicine guidance recommends including sodium in fluids for exercise over an hour and warns against simply drinking as much as possible — over-drinking plain water is the main cause of exercise-associated hyponatremia. Work out your personal numbers with our hydration and sweat-testing guide, then size your gear to carry it.
Run-leg hydration gear (the part most guides skip)
Bike-focused hydration guides stop at T2, but the run has its own small category of gear — and knowing whether you need any saves money and fuss.
Most short-course athletes need nothing. For a sprint or Olympic 5–10 km run, aid stations every couple of kilometres are enough; carrying a bottle just adds weight and heat. Grab, sip, and toss cups at the tables.
When you might want a carrier:
- Handheld bottle — a small bottle with a strap across the back of your hand. Simple and cheap, good if you want sips between stations or carry a specific electrolyte mix. The downside is an occupied hand and a slight gait imbalance.
- Hydration belt — a waist belt holding one large or several small bottles, plus pockets for gels. Steady and hands-free; the trade-off is bounce if it's loose or overloaded. Cinch it tight and load it evenly.
- Soft flasks — collapsible flasks that shrink as you drink, so they don't slosh; they live in belt pockets or a tri-suit pocket. The most comfortable way to carry a concentrated mix you'll dilute with course water.
For long course in heat, a belt or flask lets you control your own electrolyte concentration rather than relying on whatever the course pours. Whatever you choose, run with it fully loaded in training — a belt that's fine empty can chafe and bounce when full.
Filling, carrying and swapping: using the gear well
Good gear still needs good habits. A few practical routines make hydration reliable on the day.
- Pre-mix and label. Make up your electrolyte bottles the night before and mark them so you don't confuse concentrated mix with plain water mid-race.
- Freeze one bottle. In the heat, freeze a bottle two-thirds full and top it with water at the start; it thaws into a cold drink over the first hour. Never freeze a bottle completely full — it'll split.
- Rehearse aid-station hand-ups. Practise grabbing and, if needed, ditching a bottle at speed. With a top-fill system, practise the tear-and-pour so it's smooth. Know that you can ride through slightly slower to catch a bottle rather than miss it.
- Practise drinking in the aero position. Reaching for a down-tube bottle at speed is a skill; a BTA straw removes the reach but you still need to sip without drifting. Build it into training rides until it's second nature.
- Ditch zones. You can only discard bottles in marked littering zones near aid stations — dropping kit elsewhere is a penalty, so plan your swaps around them.
Cleaning and maintaining hydration gear
Hydration gear is the one piece of kit that grows things if you neglect it, and a mouldy bottle or bladder is both grim and a stomach risk. Maintenance is simple but non-negotiable.
- Wash after every use. Rinse bottles immediately — sugary electrolyte residue is what mould feeds on. A hot soapy wash with a bottle brush, or the top rack of the dishwasher for dishwasher-safe bottles, does the job.
- Dry fully, stored open. The real enemy is a damp, sealed bottle. Dry bottles upside down and store them with the cap off so air circulates.
- Deep-clean valves and straws. Bite valves, straws and top-fill lids trap residue; use a small straw brush and, periodically, a soak in a sterilising or bicarbonate solution.
- Bladders and soft flasks need drying inside — prop them open, and freeze a clean, damp bladder between uses if you can't dry it fully, to stop mould forming.
- Check the hardware. Cage bolts vibrate loose over time; check and snug them occasionally, and inspect cage retention so a worn cage doesn't start ejecting bottles.
Replace bottles once they smell permanently off or the valve stops sealing — they're cheap, and a clean bottle is part of a clean stomach on race day.
Matching your kit to the race — and where to go next
Pull it together into a setup that fits your distance, then use the specialised guides for the parts this one hands off.
A quick gear list by distance:
- Sprint: one frame bottle. That's genuinely all.
- Olympic: two frame bottles; a race belt for a gel or two.
- 70.3: two frame bottles plus a BTA or behind-saddle bottle; consider a soft flask for the run.
- Ironman: frame cages plus a top-fill front or rear system for fast refills, and a run belt or flask for your own electrolyte on the run.
This guide covered the equipment. For the questions it deliberately left out:
- The aerodynamics of where to put your bottles: the aero bottle placement guide.
- How much to drink and how to sweat-test: the hydration guide.
- What to actually put in your bottles: electrolytes explained and tablets vs drink mix.
- Hydrating in the heat: racing in the heat.
Buy the smallest setup that carries what you need and refills easily, rehearse it, and keep it clean — that's the whole job of hydration gear.
Triathlon hydration gear at a glance
| System | Where it goes | Typical capacity | Access | Best for |
|---|---|---|---|---|
| Frame bottle cage | Down tube / seat tube | 550–750 ml each | Reach down | Every distance; the foundation |
| BTA / front bottle | Between the aero bars | 500–800 ml | Sip via straw, no reach | Long course; easy frequent sipping |
| Behind-saddle carrier | Behind the seat | 600–900 ml | Hard to reach at speed | Extra capacity for 70.3 / Ironman |
| Handheld bottle | In your hand (run) | 300–600 ml | Instant | Run sips between aid stations |
| Hydration belt / soft flask | Waist / pocket (run) | 150–600 ml | Hands-free | Carrying your own run-leg mix |
Sources
Sources are listed so readers can verify consequential claims and dated details.
- American College of Sports Medicine Position Stand: Exercise and Fluid Replacement (Sawka et al., 2007) — Medicine & Science in Sports & Exercise (accessed September 17, 2026)
Frequently asked questions
What hydration gear do I actually need for my first triathlon?
For a sprint, one frame bottle cage and a bottle is enough — you'll only drink a few hundred millilitres on the bike, and the run has aid stations. Add a second frame cage for Olympic distance. You don't need aero or behind-seat systems until you're racing 70.3 or longer. Keep it simple and spend your attention on practising drinking while riding.
How do I stop my bottle bouncing out on rough roads?
Bottle ejection is a cage-and-fit problem. Use cages with firm retention — side-entry or wrap-around designs grip better than flimsy open ones — and match the cage to your bottle, tightening the retention screw if it has one. On chip-seal or cobbles, test your exact bottle-and-cage combo over bumps before race day rather than discovering the problem mid-race.
Do I need a special aero bottle, or are normal bottles fine?
Normal squeeze bottles in frame cages are perfectly fine for most racing and all training. Aero front (BTA) and behind-saddle bottles mainly help on long, fast courses — partly for airflow and partly for easy sipping and quick refills. Whether the aerodynamic gain is worth it for you is covered in our aero bottle placement guide; the gear itself works either way.
Should I carry water on the run?
Usually not for a sprint or Olympic run — aid stations every kilometre or two are enough, and a bottle just adds weight and heat. Consider a handheld, belt or soft flask for a 70.3 or Ironman run, or in heat, when you want to control your own electrolyte concentration between stations. Always train with it fully loaded so it doesn't bounce or chafe on the day.
How do I clean hydration bottles and bladders?
Wash after every use before residue dries — hot soapy water with a bottle brush, or the top dishwasher rack for dishwasher-safe bottles. Deep-clean valves and straws with a small brush and an occasional sterilising or bicarbonate soak. The key is drying fully with the cap off so air circulates; a damp, sealed bottle is how mould starts. Freeze a clean bladder between uses if you can't dry it.
Can I use a hydration pack or backpack in a triathlon?
Packs are allowed in most events but rarely used — they add weight, trap heat against your back, and are slower than frame and aero bottles. Almost all triathletes carry fluid on the bike with cages and aero systems, and on the run with a belt or handheld if anything. Check your race rules, but there's usually a better, cooler option than a pack.